Hey everyone! I'm back with another installment of
Today's project is DIY Paper Rose Garland
You'll need: 1) Paper 2) Twine 3) Scissors 4) Glue
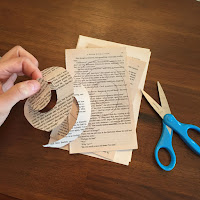
- Start by drawing a spiral on your paper. If you have a good eye, you can skip this step and head right for your scissors to cut the spirals like I did. I'm using pages from an old books & dictionaries.
- Now sit in front of the TV or turn on some good music as you do this repeatedly. Make as many as you want. More spirals = more roses = longer garland. So go to town!
- Once you've cut all your spirals, start rolling! Take one sheet. Begin from the outside of the spiral and tightly coil until you get to the end. Now release it. Don't be afraid to do this part - this is how your paper will expand & allow your rose to look more realistic. Using a glue gun, add a dollop of glue and press the flower part into it - once dry, this is how your rose will be held secure.
- As you go along, realize that these are meant to be imperfect. Don't be alarmed to notice that your roses are turning out differently each time. No two are the same, just like real flowers. Another tip? Sometimes to speed things up I wind all of my flowers, then get out the glue and secure them all at once. You really can't go wrong with whatever system you adopt.

- Once you have a pile of roses, unwind a length of twine. Add your roses by turning them upside down, putting another dollop of glue on the backside, then pressing the twine into place. Hold each one for a few seconds before moving on to the next to ensure a snug bond.
You can make your garland as long as you wish. And now that you are an expert at paper rose making, get creative with adding flowers to other projects - picture frames, present toppers, or even a bunch wired to sticks in a vase. I put my garland on a Christmas tree in our dining room, but I like it so much I might keep it out all year long :) Thanks for stopping over today. If you try this project, I wish you success!


How fun and pretty Gilly! I can't wait to try this! Looks so pretty on your tree!
ReplyDelete