Saturday, December 12, 2015

DIY Bath Bombs

Hi guys! 

Today we're making Bath Bombs.


These are great for gifting AND personal use...because if you're anything like me, you love a nice warm bath in the winter months. If you're looking for a simple gift that's low cost but high impact, give these a try.

Let's get started with the list of supplies you'll need:
    • 1/2 cup citric acid*
    • 1 cup baking soda
    • 3/4 cup cornstarch
    • 1/4 cup epsom salt
    • food coloring
    • essential oil of your choosing
    • small spray bottle
    • silicon ice cube tray

*If you're having trouble finding citric acid, look in the spice section at your local health food store - it's granulated and comes in a shaker because some use it as a salt substitute. Who knew?!


DIRECTIONS

  1. Dump the citric acid, baking soda, cornstarch and epsom salt into a bowl and stir.
  2. Fill your spray bottle with tap water and some drops of food coloring, as dark as you want it.
  3. Spray the mixture in your bowl and stir. You want the mixture to get clumpy like wet sand. The more you spray the more color you'll get. And if your mixture fizzes a little bit right now, that's okay.
  4. Now add drops of your essential oil - I used peppermint - as many as you like to reach desired smell.
  5. Using a spoon and your hands, press the mixture into your mold. Pack it in hard so your bombs won't crumble upon removal. I used ice cube trays, but muffin tins would work also.
  6. Let your bombs sit over night, then carefully pop them out and package them. Ta-da! This recipe will make 15 bombs using a 3x5 grid silicon ice cube tray. I doubled it to make two colors.

I packaged mine in clear cellophane wrap - if you use a jar, poke an air hole in the top because the bombs like a little bit of air. Another tip: Don't be too rough with them because they are fragile. You want to be sure these get to your bath in one piece for maximum enjoyment!

This year I gave these to my mom & sisters along with homemade body butter and a coffee scrub. I like using beauty products that are free from harmful {or just plain hard to pronounce} ingredients. By making your own, you control the mix-ins, and it's fun!

Keep creating, DIYers!

Friday, December 4, 2015

Paper Rose Garland

Hey everyone! I'm back with another installment of


Today's project is DIY Paper Rose Garland
You'll need: 1) Paper 2) Twine 3) Scissors 4) Glue

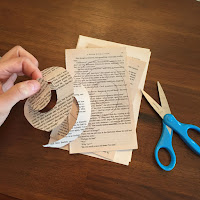
  • Start by drawing a spiral on your paper. If you have a good eye, you can skip this step and head right for your scissors to cut the spirals like I did. I'm using pages from an old books & dictionaries.
 

  • Now sit in front of the TV or turn on some good music as you do this repeatedly. Make as many as you want. More spirals = more roses = longer garland. So go to town!
        

  • Once you've cut all your spirals, start rolling! Take one sheet. Begin from the outside of the spiral and tightly coil until you get to the end. Now release it. Don't be afraid to do this part - this is how your paper will expand & allow your rose to look more realistic. Using a glue gun, add a dollop of glue and press the flower part into it - once dry, this is how your rose will be held secure. 
        
  • As you go along, realize that these are meant to be imperfect. Don't be alarmed to notice that your roses are turning out differently each time. No two are the same, just like real flowers. Another tip? Sometimes to speed things up I wind all of my flowers, then get out the glue and secure them all at once. You really can't go wrong with whatever system you adopt.
  • Once you have a pile of roses, unwind a length of twine. Add your roses by turning them upside down, putting another dollop of glue on the backside, then pressing the twine into place. Hold each one for a few seconds before moving on to the next to ensure a snug bond.


You can make your garland as long as you wish. And now that you are an expert at paper rose making, get creative with adding flowers to other projects - picture frames, present toppers, or even a bunch wired to sticks in a vase. I put my garland on a Christmas tree in our dining room, but I like it so much I might keep it out all year long :) Thanks for stopping over today. If you try this project, I wish you success!

Keep creating, DIYers!

Wednesday, December 2, 2015

Old Elm Christmas Decor

Season's greetings! Here are a few snapshots of our house all decked out for the holidays. Enjoy!