Saturday, December 12, 2015

DIY Bath Bombs

Hi guys! 

Today we're making Bath Bombs.


These are great for gifting AND personal use...because if you're anything like me, you love a nice warm bath in the winter months. If you're looking for a simple gift that's low cost but high impact, give these a try.

Let's get started with the list of supplies you'll need:
    • 1/2 cup citric acid*
    • 1 cup baking soda
    • 3/4 cup cornstarch
    • 1/4 cup epsom salt
    • food coloring
    • essential oil of your choosing
    • small spray bottle
    • silicon ice cube tray

*If you're having trouble finding citric acid, look in the spice section at your local health food store - it's granulated and comes in a shaker because some use it as a salt substitute. Who knew?!


DIRECTIONS

  1. Dump the citric acid, baking soda, cornstarch and epsom salt into a bowl and stir.
  2. Fill your spray bottle with tap water and some drops of food coloring, as dark as you want it.
  3. Spray the mixture in your bowl and stir. You want the mixture to get clumpy like wet sand. The more you spray the more color you'll get. And if your mixture fizzes a little bit right now, that's okay.
  4. Now add drops of your essential oil - I used peppermint - as many as you like to reach desired smell.
  5. Using a spoon and your hands, press the mixture into your mold. Pack it in hard so your bombs won't crumble upon removal. I used ice cube trays, but muffin tins would work also.
  6. Let your bombs sit over night, then carefully pop them out and package them. Ta-da! This recipe will make 15 bombs using a 3x5 grid silicon ice cube tray. I doubled it to make two colors.

I packaged mine in clear cellophane wrap - if you use a jar, poke an air hole in the top because the bombs like a little bit of air. Another tip: Don't be too rough with them because they are fragile. You want to be sure these get to your bath in one piece for maximum enjoyment!

This year I gave these to my mom & sisters along with homemade body butter and a coffee scrub. I like using beauty products that are free from harmful {or just plain hard to pronounce} ingredients. By making your own, you control the mix-ins, and it's fun!

Keep creating, DIYers!

Friday, December 4, 2015

Paper Rose Garland

Hey everyone! I'm back with another installment of


Today's project is DIY Paper Rose Garland
You'll need: 1) Paper 2) Twine 3) Scissors 4) Glue

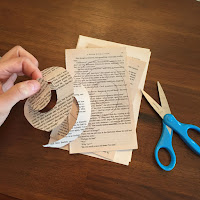
  • Start by drawing a spiral on your paper. If you have a good eye, you can skip this step and head right for your scissors to cut the spirals like I did. I'm using pages from an old books & dictionaries.
 

  • Now sit in front of the TV or turn on some good music as you do this repeatedly. Make as many as you want. More spirals = more roses = longer garland. So go to town!
        

  • Once you've cut all your spirals, start rolling! Take one sheet. Begin from the outside of the spiral and tightly coil until you get to the end. Now release it. Don't be afraid to do this part - this is how your paper will expand & allow your rose to look more realistic. Using a glue gun, add a dollop of glue and press the flower part into it - once dry, this is how your rose will be held secure. 
        
  • As you go along, realize that these are meant to be imperfect. Don't be alarmed to notice that your roses are turning out differently each time. No two are the same, just like real flowers. Another tip? Sometimes to speed things up I wind all of my flowers, then get out the glue and secure them all at once. You really can't go wrong with whatever system you adopt.
  • Once you have a pile of roses, unwind a length of twine. Add your roses by turning them upside down, putting another dollop of glue on the backside, then pressing the twine into place. Hold each one for a few seconds before moving on to the next to ensure a snug bond.


You can make your garland as long as you wish. And now that you are an expert at paper rose making, get creative with adding flowers to other projects - picture frames, present toppers, or even a bunch wired to sticks in a vase. I put my garland on a Christmas tree in our dining room, but I like it so much I might keep it out all year long :) Thanks for stopping over today. If you try this project, I wish you success!

Keep creating, DIYers!

Wednesday, December 2, 2015

Old Elm Christmas Decor

Season's greetings! Here are a few snapshots of our house all decked out for the holidays. Enjoy!


Monday, November 9, 2015

October Run-down

Well guys, whole month has gone by with no posts from me. It's true - I never blogged once in October. Whoops. We did tackle some stuff around the house & enjoyed the first official month of Fall in Ohio. Now we're looking forward to Thanksgiving and Christmas, which we all know will be here in no time. But before I get ahead of myself, here's a run-down of the things we did last month:

Andrew turned 30 and we had everyone over for cake, pumpkin pie, and ice cream:


We got new rugs! One is in the dining room under the table, the other is in the kitchen nook. They are both from World Market - we were grateful to take advantage of a big sale.


I painted the trim & cabinet in the guest bathroom. From oak to gray, I'd say it was a nice little upgrade (for the cabinet especially). I only have a few more rooms to do before all the trim in the house is white.


We passed out candy for trick-or-treaters the evening of October 31 {so festive!} then attended an annual costume party hosted by our friends. Check out our fun costumes!


Some of the greatest Halloween costumes we saw this year included a girl dressed as a Softball Trophy - entirely spray painted gold, complete with bat and little wooden stand; a toddler Fly Fisherman collecting candy in his net, and a Green Army Man that was the spitting image of the small plastic toys we all had growing up. People are so clever! What are some of the cool costumes you saw?

I'm not quite ready to decorate for Christmas - I like to wait until after Thanksgiving. So I packed the jack-o-lanterns and ghosts up, but left out the pumpkins & got a few turkey themed items out. I also made this canvas to put on our mantle:


Thanks for checking in with us over here at Old Elm... I hope you all had very pleasant Octobers. I hope to write again soon with tales of more projects conquered!

Keep creating, DIYers!

Wednesday, September 23, 2015

Breakfast Nook

I really like the farmhouse style/JoAnna Gaines type kitchens. You know what I mean? Think wooden floors, white subway tile, farmhouse tables and lots of beadboard. But making a breakfast nook of our own was one thing that kept getting placed on the back burner. Probably because we're amateurs who have real day jobs and do not have ton of money to just toss around! But at a slow steady pace, Andrew & I have been working on transforming our house, and in a lot of ways we are getting closer to the "look" we like want… 
  • The kitchen cabinets were painted white. Check
  • We added breadboard to them. Check
  • The dining room got board & batten. Check
  • The fireplace got a facelift. Check
  • Flooring is done. Check

It seemed that all we had remaining was to figure out how to make our nook bench. 
Well folks, we finally made it & here's how it all went down.


There are several ways to get the bench. Build it from scratch, turn an Ikea bookshelf on its side, use old church pews, etc. I decided we would make ours out of kitchen cabinets. {What can I say, I wanted the extra storage!} So I bought two builder-grade oak cabinets from Lowe's. For a long time, they just sat in our basement and we doubted if this was a project we would ever accomplish.  Then earlier this month, Andrew had a night where he was REALLY inspired, and he just started going to town on it. Turns out this one wasn't the headache we feared it would be. We had everything built in 2 nights, I took 3 days to paint it, and then all we had to do was order cushions & charrs for the other side of the farmhouse table.


We removed the baseboards and measured where we wanted the bench to be on the wall. Then we added a frame to the back {between the wall & cabinets} so the bench wouldn't be so narrow. Next Andrew devised a way to attach the bench to the wall using L-brackets cleverly hidden under the baseboards. He's a gem! The last part of construction was securing a large piece of plywood to the top with the air nailer & putting the beadboard on the sides to match the kitchen cabinetry. Things were looking good!

Then I painted. I used my old stand-by Valspar Bonding Primer. Things were now looking super good! The end was in sight! After everything dried, I caulked the cracks and we accessorized.
A sidenote about our "accessories"… The cushion is from Pottery Barn. Andrew found it online and we were jazzed because it had the same dimensions of our bench. Weirdly, the thing came and it was 2.5 inches narrower (is that a word?) than advertised. So PB sent me another just to be sure mine wasn't a defect… replacement cushion was wrong too. We decided to just keep it & added the board & batten to the back of our bench to compensate the missing inches. We're both in love with this detail now, so evidently it was all a blessing in disguise. Next fun challenge - the chairs are from Restoration Hardware, and we had to send several back because they kept arriving broken. So who even knows if they will be durable enough to stand the test of time. For now they look cute and hey, they were on sale. So whatta ya gonna do! 
So with the bench built, board and batten add-on, cushion/pillows, table/chairs in place…we are ready to use this bad boy! Icing on the cake will be to find a cool silver lantern to hang instead of the current light. We're in no rush. Thanks so much for checking in to see what's new with us. I've been a bad blogger. I would say you should check back soon for more frequent posts, but who are we kidding!

Keep creating out there, people!

Saturday, August 22, 2015

Better Late Than Never

Today we mulched. 
Which seems kind of silly considering the theme of my last post was how soon Fall is approaching.

However, we sort of did this on purpose. We're having around fifty people over in a month or so to celebrate my mother-in-law's birthday, so we wanted things to look presentable for that. We bought a bunch of colorful perennials for the bed near our garden, and planted a row of mums out front. The mulch makes even our existing plants look better. It was a long day spreading four yards, but it's a good feeling to see the pay-off of all our hard work.


Here's a shot of some of the new perennials, which are to the right of the deck.

In this picture you can see that we mulched around the new flowers, then added top soil and grass seed {the blue specks} 

It's been pretty hot and dry lately, so I'll have to focus on watering a bunch back here so it grows and the plants don't turn into burnt crisps.


Here are the existing host plants and hydrangea with new mulch surrounding.

The hydrangea blooms dried up, so I pruned them. I read that if you cut where the bloom was, the next year there will be two from that spot. So the bush will grow and blooms will increase. Hopefully that is the case! I also read you can put coffee grounds around the base of each plant to keep the soil acidic & help retain moisture.


Thanks for stopping by OE!

Tomorrow we'll move things inside to finish quarter round in the kitchen. What are your plans?
Happy Weekend!

Thursday, August 20, 2015

Fall is Just Around the Corner

Hard to believe there are only 30 more days of summer. Between cookouts, ballgames, ice cream runs, weekend trips & family vacations, it's definitely been a season jam-packed with fun. We've been able to conquer a decent amount of tasks on our To-Do List plus take time to enjoy our favorite aspect of warm sunny weather: recreation, rest, & relaxation {when we aren't at work, that is!} Although we have no children, when I heard it was time for kids to go back to school I thought to myself, "can't believe it's that time already!" Fall is just around the corner.

Zipping through the Smokies on our summer vacation to Asheville, NC

Fall brings a lot to look forward to…bonfires, football, Halloween, changing leaves, boots, pumpkin flavored everything, and then Thanksgiving. It's nice to see how nature takes on a different look out in our yard. Andrew always loves Fall best because of football {of course} and he secretly also loves mums & sedum, two plants that stick around to look awesome while everything else withers away in preparation for snow. This Fall will be especially great because we'll be celebrating his 30th birthday in October. We both set aside a week off work to mark the occasion with a special trip for just the two of us. Can't wait!

From a decorating standpoint, I'm also getting excited to get Old Elm all decked out for the season. 

Here are some of the seasonal things I like most:


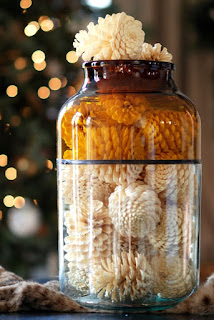
From the top // a great little spread + banner from Pottery Barn // Jack O'Lantern shades from Ballard Designs // Did you know you can bleach pinecones?! Click here for the must try tutorial // I don't know about you guys, but I never miss The Great Pumpkin! // And finally, two fun party ideas- candy in vintage glass canisters & squash bowling for your fall yard party fun!

What are your favorite Fall traditions & home decor items?